
After one week of playing around with Swift I have some opinions on using the storyboard. It’s weird. But, it definitely makes creating an app real easy. For example, if I want to make an application that has multiple pages, I can do that all via the storyboard. Styling the pages on storyboard, is another beast, and we won’t get into that right now.
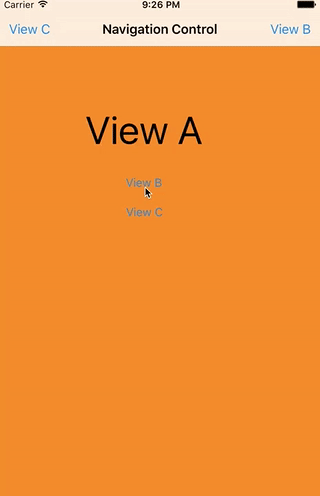
In this post, I’ll go through steps to create an app that has 3 views/pages/scenes/whatever-you-call-it. You can navigate between each page via buttons on the actual views/pages/scenes and buttons on the navigation bar.

Tools:
- Swift 2.2
- Xcode Version 7.3.1
Step 1: Create swift project The first step to create your app is to actually create it! Make sure you select “Single View Application”, name your project, and deselect “Use Core Data”, “Include Unit Tests”, and “Include UI Tests” as we are not testing at all here.
iOS > Application > Single View Application

Step 2: Create the Navigation Controller In this example, I want to create an application that has 3 pages. You can, of course, expand this and make multiple pages. Now, let’s start with adding in a “Navigation Controller”.
- Open “Main.storyboard”
- Select “View Controller”
- Go to “Editor” > “Embed In” > “Navigation” in the toolbar

Step 3: Create Views Now, let’s add a “View Controller”. When we do this, we will need to connect them via “seques”. Once we do that we can also select how the pages appear/transition. Also, let’s style it just to differentiate the pages from each other – I’m just going to give them different background colors.
- Search “View Controller” and then drag that into your storyboard.
- Remember, don’t overlap it with your “Navigation Controller” or the other existing
- “View Controller”.

Extra: Showing how to update the background color of a view.
Step 4: Connect the Views So how do you go from one page to another? This is the step to connect the views. Here, we’ll add a button, and then “segue” it to the other view.
- Search for “Button” and then drag into the first view. You can change the text.
- Click to select the button that was just added.
- Hold down the “ctrl” key and drag a “connection” line to the next view.
- You will see a pop-up with “Action” options - select “show”
Step 5: There you have it! You can run the App Simulator and go back and forth between your 2 views. If you want, with the information here, add a third view and multiple links to go back and forth.

Side Note: If you do not add the Navigation Bar the seques will not be a left-right movement. It will end up sliding your views into the scene. My advice would be to add the Navigation Bar and then hide it in the component’s settings if you don’t want a visible navigation.
You can get the storyboard project is in this repo.
Leave a Reply