
A whiles back ago I was trying to learn how constraints work. Today, I still have no idea what the heck is going on.
While learning, I can across a bunch of tutorials that helped. However, I don’t remember what blog I particularly liked.
This post contains a couple of classes that I made to help me add constraints to UIViews.

Tools:
- Swift 3.0
- Xcode Version 8.0
Layouting
Below is a class named Layout with a static function setupConstraint that accepts the following parameters that lets me layer UIViews that have either fixed or flexible widths and heights
- forView: UIView
// What UIView do you want to add constraints to? - top: Int? = nil
// Top padding - bottom: Int? = nil
// Bottom padding; Negative integer - left: Int? = nil
// Left padding - right: Int? = nil
// Right padding; Negative integer - height: Int? = nil
Specified height - fixedHeight: Bool = false
// Boolean defaulted to false; If you want a fixed UIView, give it a height (above) - width: Int? = nil
// Specified width - fixedWidth: Bool = false
// Boolean defaulted to false; If you want a fixed UIView, give it a width (above) - selfView: UIViewController
// What is the UIViewController's view?
import UIKit

class Layout {
  static func setupConstraint (forView: UIView, top: Int?=nil, bottom: Int?=nil, left: Int?=nil, right: Int?=nil, height: Int?=nil, fixedHeight: Bool = false, width: Int?=nil, fixedWidth: Bool = false, selfView: UIViewController) {

    var parentViewController: UIView? {
        return selfView.view
    }

    forView.translatesAutoresizingMaskIntoConstraints = false //USING AUTOLAYOUT NOT FRAMES

    var l = NSLayoutConstraint() // LEFT
    var r = NSLayoutConstraint() // RIGHT
    var t = NSLayoutConstraint() // TOP
    var b = NSLayoutConstraint() // BOTTOM

    if (left != nil) {
        l = forView.leadingAnchor.constraint(equalTo: (parentViewController?.leadingAnchor)!, constant: CGFloat(left!)) // LEFT
    }

    if (right != nil) {
        r = forView.trailingAnchor.constraint(equalTo: (parentViewController?.trailingAnchor)!, constant: CGFloat(right!)) // RIGHT
    }

    if (top != nil) {
        t = forView.topAnchor.constraint(equalTo: (parentViewController?.topAnchor)!, constant: CGFloat(top!)) // TOP
    }

    if (bottom != nil) {
        b = forView.bottomAnchor.constraint(equalTo: (parentViewController?.bottomAnchor)!, constant: CGFloat(bottom!)) // BOTTOM
    }

    if (fixedHeight) {
        // FIXED HEIGHT
        let h = forView.heightAnchor.constraint(equalToConstant: CGFloat(height!))
        parentViewController?.addConstraints([t, b, l, r, h])
    } else if (fixedWidth) {
        // FIXED WIDTH
        let w = forView.widthAnchor.constraint(equalToConstant: CGFloat(width!))
        parentViewController?.addConstraints([t, b, l, r, w])
    } else if (fixedHeight == false && fixedWidth == false) {
        // VARIABLE HEIGHT & WIDTH
        parentViewController?.addConstraints([t, b, l, r])
    }
  }
}
Flexible Height and Width With Constraints on Top, Right, Bottom, and Left

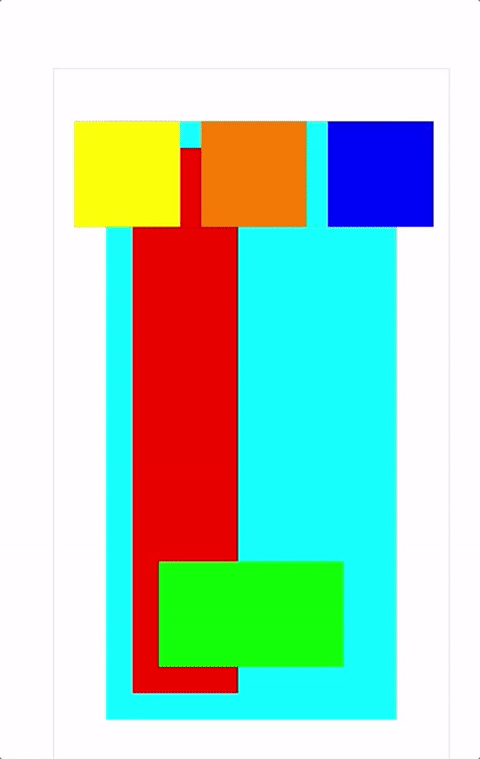
This is an example of a UIView with constraints on the top, right, bottom, and left side. When you rotate your simulator, the shape of the UIView is flexible and the constraints, or fake margin, remain constant.
let myCyanUIView = UIView()
myCyanUIView.backgroundColor = UIColor.cyan
self.view.addSubview(myCyanUIView)
// Add layout constraint after adding my subview
Layout.setupConstraint(forView: myCyanUIView,
  top: 50,
  bottom: -50,
  left: 50,
  right: -50,
  //height: 0, // I don't want a fixed height, so I can give this an arbitrary number or remove this paramater
  fixedHeight: false, // <===
  //width: 0, // I don't want a fixed width, so I can give this an arbitrary number or remove this paramater
  fixedWidth: false, // <===
  selfView: self)
Fixed Width With Constraints on Top, Bottom, and Left

This example is of a UIView “pegged” to the left side of the viewport. The height will vary upon the orientation of the device.
let myRedUIView = UIView()
myRedUIView.backgroundColor = UIColor.red
self.view.addSubview(myRedUIView)
// Add layout constraint after adding my subview
Layout.setupConstraint(forView: myRedUIView,
  top: 75,
  bottom: -75,
  left: 75,
  right: nil, // <=== I want my UIView to be fixed on the left side
  //height: 0,
  fixedHeight: false, // <=== With no fixed height
  width: 100, // <=== With a fixed width
  fixedWidth: true, // <=== So, I set this to true
  selfView: self)
Fixed Height With Constraints on Right, Bottom, and Left

This example is of a UIView “pegged” to the bottom side of the viewport. The height is fixed and the width will vary upon the orientation of the device.
let myGreenUIView = UIView()
myGreenUIView.backgroundColor = UIColor.green
self.view.addSubview(myGreenUIView)
// Add layout constraint after adding my subview
Layout.setupConstraint(forView: myGreenUIView,
  top: nil, // <===
  bottom: -100,
  left: 100,
  right: -100,
  height: 100, // <===
  fixedHeight: true,
  //width: 100, // <=== I want flexible width
  fixedWidth: false, // <=== I want flexible width
  selfView: self)
Stacking
This class, Stack, lets me stack UIViews. The private function accepts the following parameters:
- views:
[UIView]// Array ofUIViews - axis:
UILayoutConstraintAxis - distribution:
UIStackViewDistribution - alignment:
UIStackViewAlignment - spacing:
Int? = 0, - selfView:
UIViewController, - parentContainer:
UIView? = nil
I can use this in conjunction with the Layout class above.
import UIKit

class Stack {
    static func setupConstraints (views: [UIView], axis: UILayoutConstraintAxis, distribution: UIStackViewDistribution, alignment: UIStackViewAlignment, spacing: Int?=0, selfView: UIViewController, parentContainer: UIView?=nil) {

        var parentViewController: UIView! {
            return selfView.view
        }

        var pContainer = UIView()
        if (parentContainer != nil) {
            pContainer = parentContainer!
        } else {
            pContainer = parentViewController
        }

        let stackView = UIStackView()
        stackView.axis = axis
        stackView.distribution = distribution
        stackView.alignment = alignment
        stackView.spacing = CGFloat(spacing!)

        for view in views {
            var height = Int()
            var width = Int()

            if (view.frame.size.height != 0.0 && view.frame.size.width != 0.0) {
                height = Int(view.frame.size.height)
                width = Int(view.frame.size.width)
            } else {
                height = 100
                width = 100
            }
            stackView.addArrangedSubview(view)
            view.heightAnchor.constraint(equalToConstant: CGFloat(height)).isActive = true
            view.widthAnchor.constraint(equalToConstant: CGFloat(width)).isActive = true
        }

        stackView.translatesAutoresizingMaskIntoConstraints = false;
        parentViewController.addSubview(stackView)

        // Constraints FOR NESTING LOCATION
        let l = stackView.leadingAnchor.constraint(equalTo: pContainer.leadingAnchor)
        let t = stackView.topAnchor.constraint(equalTo: pContainer.topAnchor)
        parentViewController.addConstraints([l, t])
    }
}
Once you add this stacking class to your project, you can consume it like so:
let myYellowUIView = UIView()
myYellowUIView.backgroundColor = UIColor.yellow

let myOrangeUIView = UIView()
myOrangeUIView.backgroundColor = UIColor.orange

let myBlueUIView = UIView()
myBlueUIView.backgroundColor = UIColor.blue

Stack.setupConstraints(views: [myYellowUIView, myOrangeUIView, myBlueUIView],
  axis: .horizontal,
  distribution: .fill,
  alignment: .leading,
  spacing: 20,
  selfView: self,
  parentContainer: myYellowUIView)

Layout.setupConstraint(forView: myYellowUIView,
  top: 50,
  //bottom: nil,
  left: 20,
  //right: nil,
  height: 100,
  fixedHeight: true,
  width: 100,
  fixedWidth: true,
  selfView: self)
Unfortunately, I’m personally not very excited about the stacking because I didn’t flesh it out yet.
All it appears to be doing is what you can do when setting the frame's CGRect.

You can get the storyboard project is in this repo.
Leave a Reply